🎨 DIY Coloring Placemats: Turn Your Coloring Pages into Reusable Table Art
If you love creative crafts, you’ll adore this project — DIY coloring placemats!
It’s a fun and straightforward way to give your finished coloring pages a second life. Whether decorating for the holidays, crafting with kids, or adding a personal touch to your dining table, this project combines art, practicality, and pure joy.
With just a few simple materials and your favorite coloring pages, you can create beautiful and functional placemats — washable, reusable, and unique. It’s a wonderful blend of mindfulness, creativity, and sustainability.
Here’s the expanded, SEO-optimized version with your keywords naturally integrated throughout:
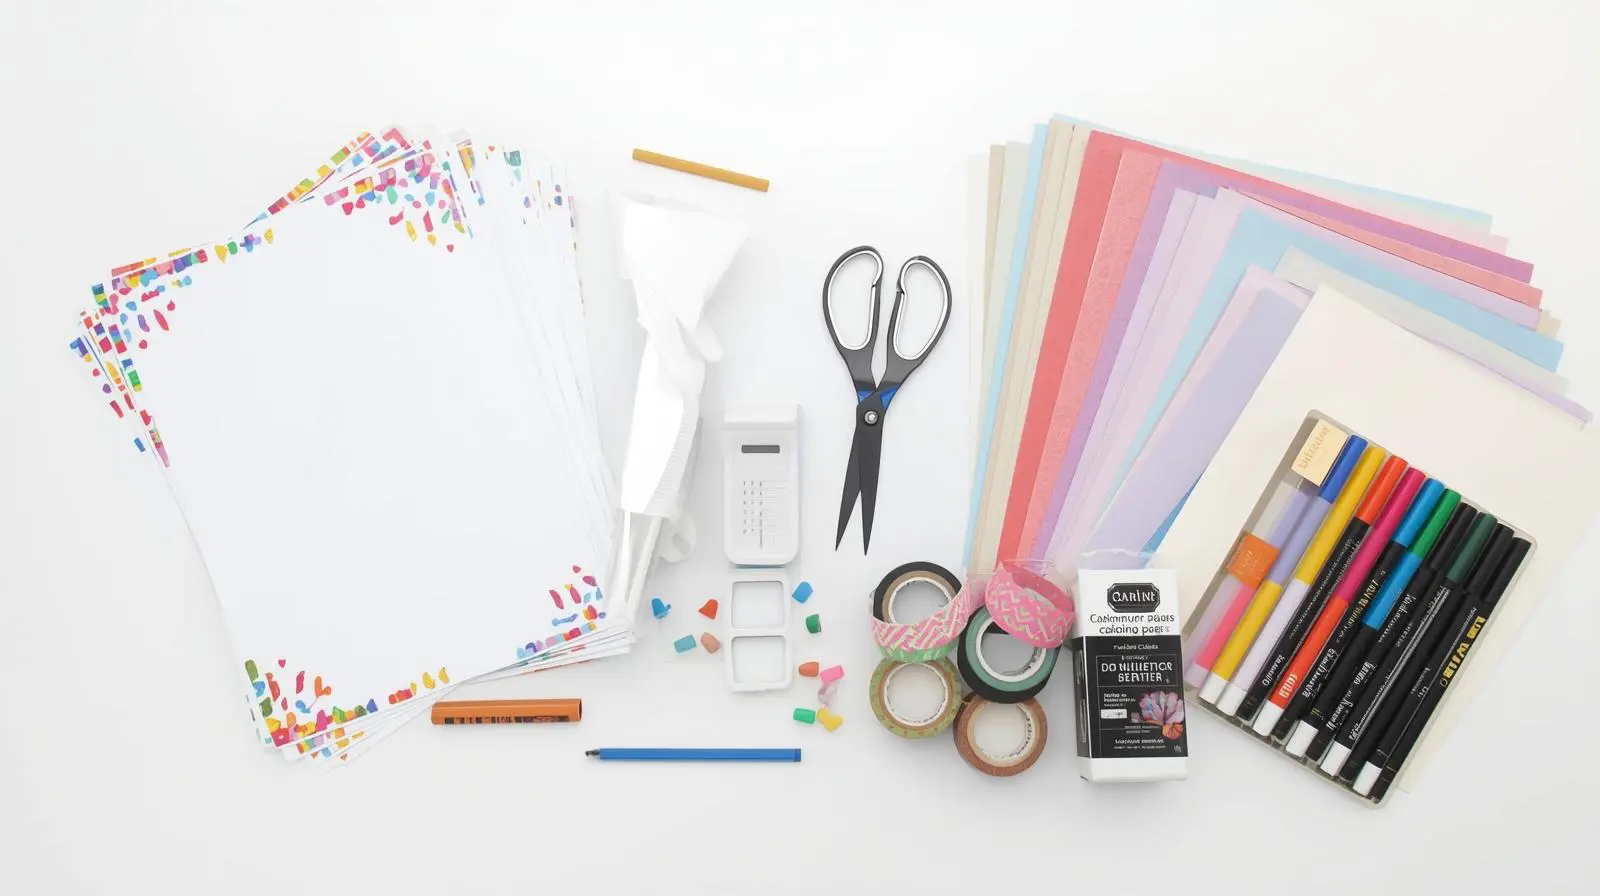
✂️ What You’ll Need to Make Coloring Placemats
Everything you need to bring these creative coloring crafts to life is simple, affordable, and easy to find. No fancy equipment required — just a little creativity and the right supplies to turn your printable table decor into something truly special.
Materials:
- Printed coloring pages (8.5×11″ or A4 size) — your creative coloring crafts start right here
- Laminating sheets or a laminating machine
- Scissors or a paper trimmer for clean, precise edges
- Optional: cardstock or decorative paper for backing your printable table decor
- Soft cloth or wipes for quick, easy cleaning after every meal
Optional extras to elevate your printable table decor:
- Washi tape for decorative borders or seasonal accents
- Metallic pens or markers to add shimmer and highlights to your DIY coloring placemats
- Hole punch and twine for hanging finished sets or organizing storage
- Stickers or themed embellishments to personalize each creative coloring craft
- Corner rounder punch for a polished, professional finish
🖍️ Step-by-Step Guide to Making Coloring Placemats
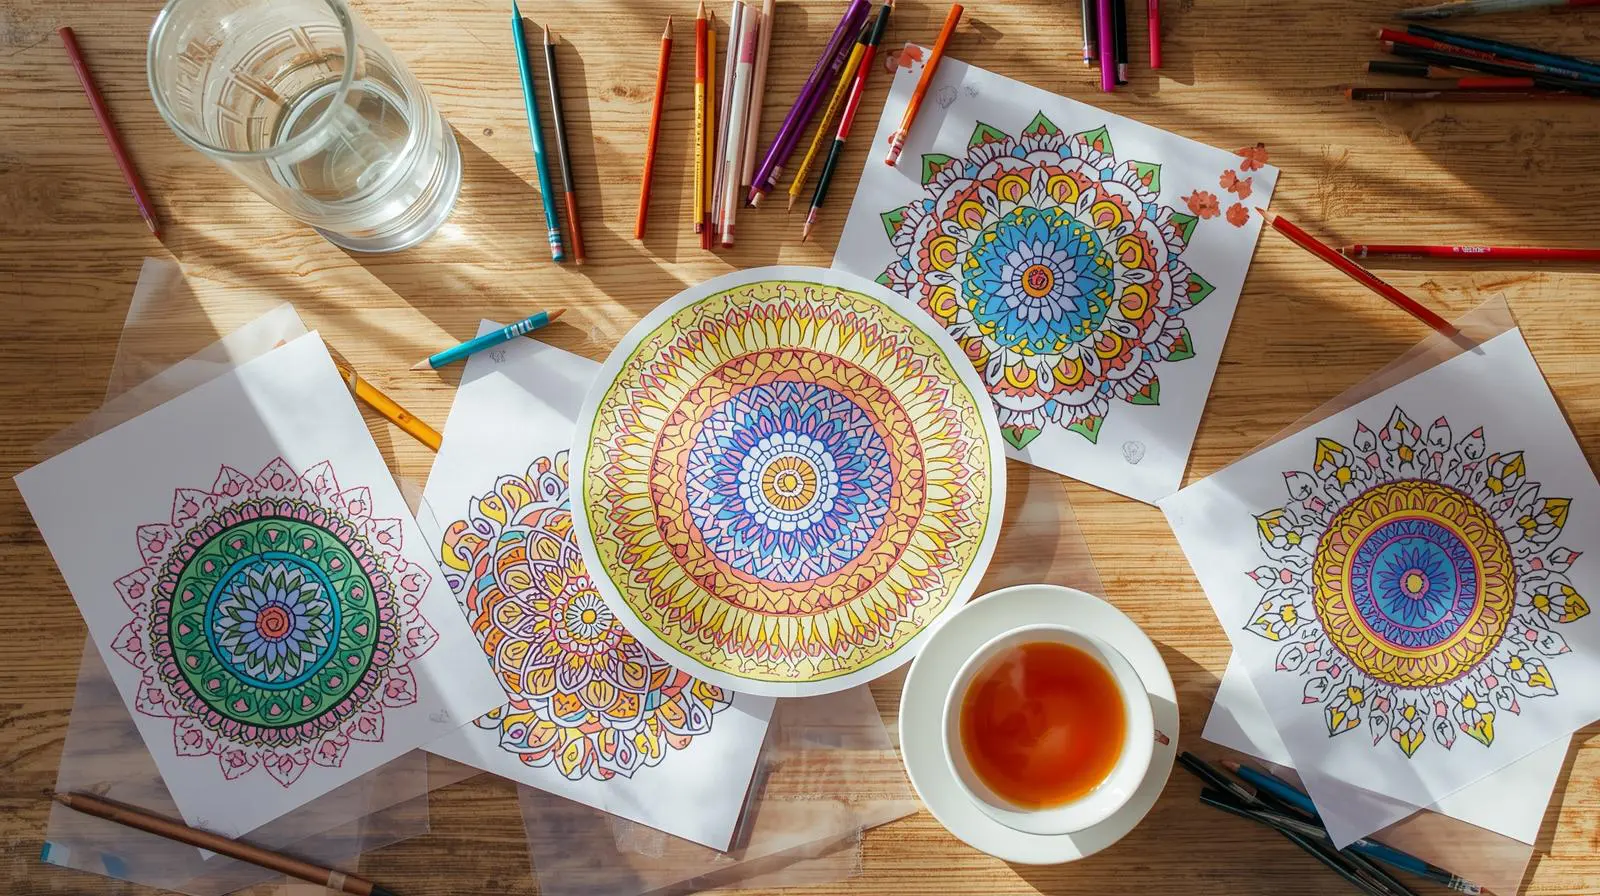
1. Choose and Color Your Designs
Start your creative coloring crafts by selecting designs that reflect your personal style, the current season, or an upcoming celebration. Cozy fall harvest scenes, winter snowflake mandalas, blooming spring florals, and breezy beachy summer patterns all make breathtaking printable table decor that guests will notice and admire.
Color your pages using colored pencils, fine liners, or alcohol markers for vibrant, even coverage. Avoid heavy watercolor or thick gouache, as they can buckle the paper and create uneven surfaces that affect the quality of your finished coloring placemats.
💡 Tip: Build a seasonal collection of creative coloring crafts by theming each set around a holiday or occasion. Think pumpkins and autumn leaves for Thanksgiving, snowmen and ornament patterns for Christmas, hearts and botanicals for Valentine’s Day, or pastel eggs and bunnies for Easter. Rotating your printable table decor throughout the year is one of the simplest and most affordable ways to keep your home feeling fresh, festive, and intentionally decorated.
You can print free coloring pages ready for this project at EGCreativity.art/free-coloring-printables.
2. Flatten and Prepare Your Pages
Once your creative coloring crafts are complete, check that each page lies perfectly flat before moving on. If your paper has curled during coloring — especially when using markers — place the finished pages between two sheets of plain paper and press them under a heavy book overnight.
A smooth, flat surface is essential for professional-looking DIY coloring placemats. Even small ripples or curled edges can cause air bubbles during laminating, which affects both the appearance and durability of your printable table decor. Taking this extra step ensures a flawless, polished result every time.
3. Add a Backing for Strength and Style
Before laminating your coloring placemats, consider gluing or taping your colored page onto a sheet of cardstock or decorative backing paper. This simple step adds thickness, stability, and an extra layer of visual interest to your finished creative coloring crafts.
Experiment with contrast by pairing vibrant coloring pages against soft cream, warm kraft, or deep jewel-toned backgrounds. The result is printable table decor that looks intentional, layered, and beautifully handcrafted rather than simply printed and cut.
🌟 Pro Tip: Back two complementary designs together to create double-sided DIY coloring placemats. This clever trick lets you flip your placemats for an instant seasonal swap — going from a Halloween theme to a Thanksgiving harvest scene in seconds — without needing an entirely new set of printable table decor. Double the designs, double the value, half the storage space.
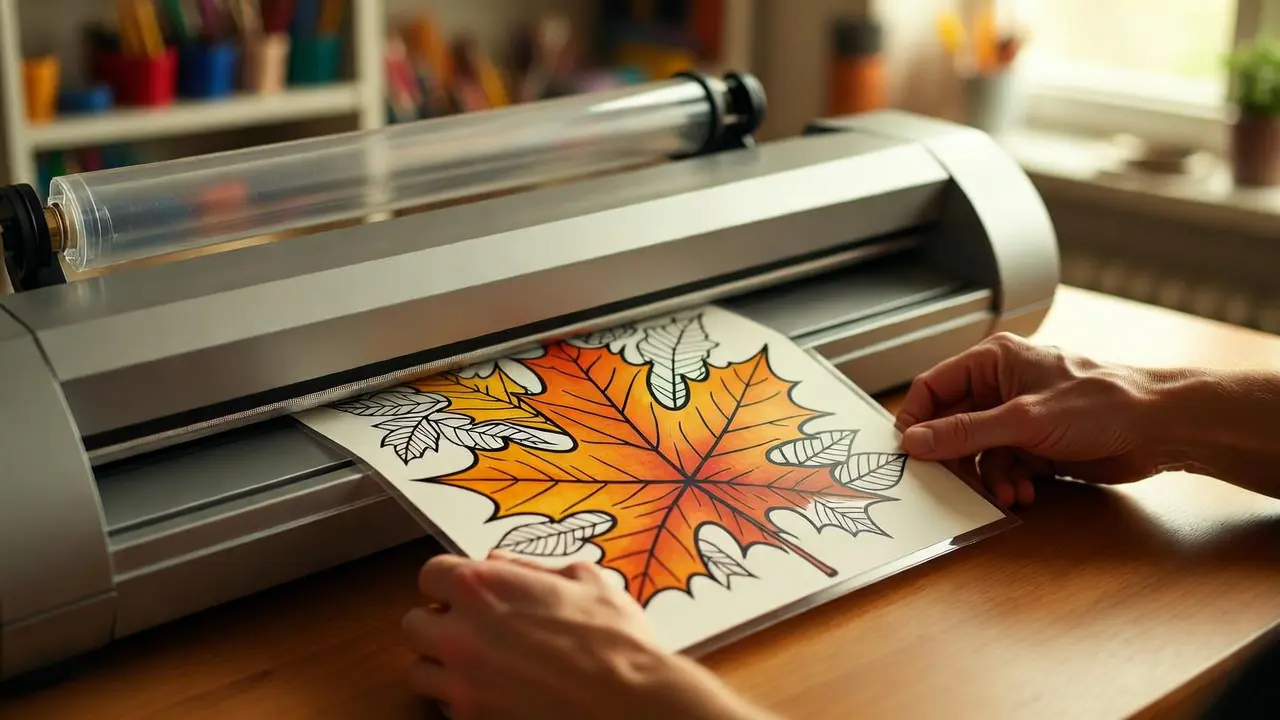
4. Laminate Your DIY Coloring Placemats
This is the step that transforms your creative coloring crafts from beautiful paper art into durable, functional, wipe-clean printable table decor. There are two equally effective methods depending on the tools you have available:
A. Laminating Machine Method: Insert your prepared, flat coloring page into a laminating pouch, leaving a small even border on all sides. Feed it slowly and steadily through the machine at the correct heat setting, then place the finished piece on a flat surface and allow it to cool completely before trimming. Rushing the cooling process can cause warping, so patience pays off here.
B. No-Machine DIY Method: Use self-adhesive laminating sheets or clear contact paper for a budget-friendly alternative that produces equally impressive results. Peel back one side of the protective layer, carefully align your DIY coloring placemat, and press down slowly from one edge to the other to prevent air bubbles. Use a ruler, credit card, or bone folder to smooth the surface as you go. Apply a second sheet to the back for full, sealed coverage and complete waterproofing.
Both methods result in finished DIY coloring placemats that are fully waterproof, highly durable, and effortlessly easy to wipe clean — successfully transforming your creative coloring crafts into functional, reusable printable table decor built to last through everyday family meals, holiday gatherings, and everything in between.
5. Trim and Finish Your Placemats
Once laminated, use sharp scissors or a paper trimmer to cut away any excess laminate, leaving a neat ¼-inch border on all sides to fully seal the edges and prevent peeling. For a truly professional finish, use a corner rounder punch to soften the corners of each DIY coloring placemat — a small detail that makes a big difference in the overall look and feel of your printable table decor.
Want to add one final flourish to your creative coloring crafts? Edge the sealed border with coordinating washi tape or run a metallic marker along the perimeter for a subtle shimmer that catches the light beautifully at the table. Simple, stunning, and completely customizable.
🌟 Creative Ways to Use Your Coloring Placemats
Once you discover how versatile these creative coloring crafts truly are, you’ll want to make them for every season, every occasion, and every person you love. Here are six inspired ways to use, display, and share your coloring placemats:
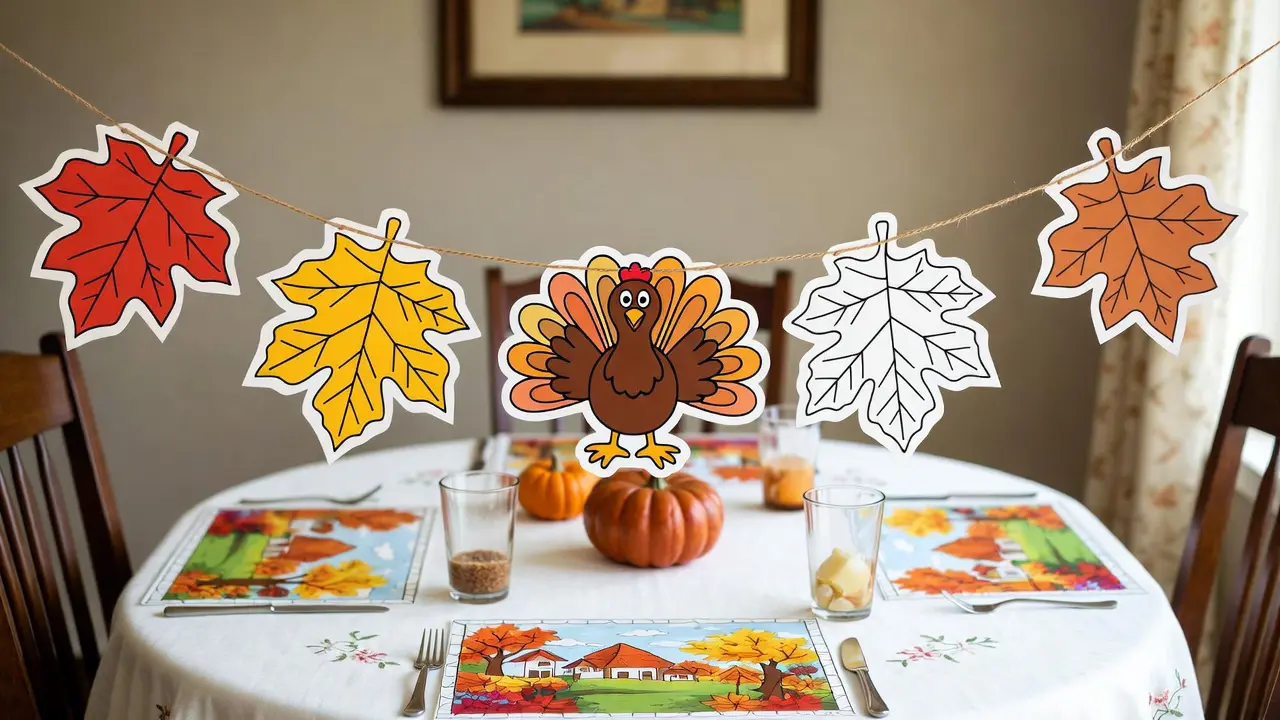
🍽️ 1. Seasonal Themed Table Settings
Rotate your printable table decor collection to match every season and celebration throughout the year. Cozy amber and rust autumn leaves for fall family dinners, intricate snowflake mandalas for winter holiday gatherings, soft watercolor florals for spring brunches, and vibrant tropical patterns for summer entertaining. Swapping out your DIY coloring placemats between seasons is one of the most effortless and budget-friendly ways to refresh your home’s atmosphere and keep your dining space feeling alive, curated, and intentionally styled all year long.
👧 2. Kids’ Activity Placemats
Let each child in your family color and personalize their very own placemat design, then laminate their finished creative coloring crafts so they can proudly see their artwork displayed and used right at the family dinner table. This simple activity builds confidence, encourages creative expression, and gives kids a genuine sense of ownership over their space.
Take it a step further by printing activity-based designs — mazes, word searches, dot-to-dot puzzles, or open doodle prompts — and laminating them for reusable, screen-free entertainment at mealtimes. Pair with a dry-erase marker, and your coloring placemats become an interactive, endlessly reusable activity station that kids will reach for again and again.
🕯️ 3. Mindful Dining Moments
Mandalas, flowing botanical illustrations, and intricate geometric patterns make deeply beautiful printable table decor for slow, intentional, mindful meals. The act of coloring these designs is meditative in itself — and surrounding yourself with the finished DIY coloring placemats at the table extends that sense of calm into your everyday dining ritual. These creative coloring crafts invite presence, beauty, and a little everyday artistry into even the most ordinary weeknight dinner.
🎁 4. Handmade Gift Sets
Bundle four coordinating laminated DIY coloring placemats into a cohesive themed set, wrap them with a linen ribbon, tuck in a handwritten note, and you have a genuinely thoughtful, one-of-a-kind handmade gift. These creative coloring crafts are perfectly suited for birthdays, teacher appreciation weeks, hostess gifts, holiday giving, and housewarming celebrations.
Elevate the gift further by pairing a set of finished printable table decor with a small tin of quality colored pencils, a fine liner set, or a mini coloring booklet — creating a complete creative gift bundle that any craft lover, home decorator, or busy parent will absolutely treasure.
🌈 5. Craft Market and Etsy Products
If you create and sell handmade goods, DIY coloring placemat printable kits — or finished laminated sets ready to use — are a natural, high-demand addition to your product lineup. This category of printable table decor appeals strongly to families with young children, craft enthusiasts, home decorators, and gift shoppers throughout every season of the year.
The low material overhead, high perceived value, and broad seasonal appeal make DIY coloring placemats an especially smart and sustainable product for Etsy digital shops, craft market tables, and creative subscription boxes. Bundle your creative coloring crafts into themed holiday collections for maximum appeal and higher average order values.
🌻 6. Decorative and Functional Uses Beyond the Table
Your laminated creative coloring crafts are far more versatile than just the dinner table. Once you start making coloring placemats, you’ll quickly discover dozens of ways to put them to beautiful, practical use throughout your home:
- Desk mats to protect work surfaces while adding a personal, artistic touch to your workspace
- Kids’ craft station mats to protect tables during painting, clay, or glitter projects — easy to wipe clean in seconds
- Shelf liners to add color and personality to open shelving, bookshelves, or display cabinets
- Framed wall art — because your finished printable table decor is genuinely stunning enough to display as artwork in its own right
- Drawer liners for a cheerful, hidden detail that makes everyday organization feel special
- Party table runners — line up multiple DIY coloring placemats end to end for an instant, coordinated, fully custom table display at your next celebration
The beauty of these creative coloring crafts is that they grow with your creativity. Start with a single set of DIY coloring placemats and watch how quickly this simple, satisfying craft becomes a cherished part of how you decorate, celebrate, and make your home feel like
💡 Laminating Tips for Best Results
- Avoid thick glue or layered embellishments before laminating — they can trap air bubbles.
- Clean with a soft, damp cloth (no harsh chemicals).
- Store placemats flat to prevent bending.
- If corners start to lift, reheat gently with an iron on low, using parchment paper on top.
- To make your laminating last longer, use 3–5 mil thickness for added durability.
🩵 Free Printable Pages to Start Your Coloring Placemats
Want to try this today? Download your free printable designs here:
👉 Free Coloring Printables – EGCreativity.art
You’ll find seasonal pages, mandalas, and nature-inspired art — perfect for turning into your next DIY coloring placemats.
🎨 Not sure where to start?
Here are our most loved products.
❓ FAQ: DIY Coloring Placemats
🎨 Not sure where to start? Here are our most loved products.
Q1: Can I make coloring placemats without a laminator? A: Absolutely! Self-adhesive laminating sheets or clear contact paper work beautifully for waterproof protection — no machine needed. They’re a budget-friendly way to finish your printable table decor and keep those creative coloring crafts looking polished meal after meal.
Q2: What paper works best for coloring placemats? A: For the best results with your creative coloring crafts, choose cardstock or paper between 100–120 gsm. It’s smooth enough for detailed coloring but sturdy enough to handle laminating — giving your printable table decor a professional, durable finish.
Q3: How do I clean laminated coloring placemats? A: Simply wipe your coloring placemats down with a damp cloth or soft sponge after each use. Skip soaking or scrubbing to protect the laminate and keep your printable table decor looking vibrant and fresh.
Q4: Can I reuse coloring placemats for different holidays and seasons? A: Yes — that’s one of the best things about printable table decor! Design and print multiple themed sets for every season or holiday, store them flat, and swap them out whenever you’re ready for a fresh, creative coloring craft at the table.
Q5: Are DIY coloring placemats safe for kids? A: Totally! Kids absolutely love bringing their creative coloring crafts to life and seeing them displayed right on the dinner table. Just supervise the laminating and cutting steps, and let them take full pride in their one-of-a-kind printable table decor.
Q6: How long do coloring placemats last? A: With proper laminating and gentle cleaning, your coloring placemats can stay bright and beautiful for years. Quality printable table decor and careful handling are all it takes to turn a simple, creative coloring craft into a long-lasting keepsake.
Here’s the expanded Final Thoughts section with your keywords naturally integrated:
✨ Final Thoughts
DIY coloring placemats perfectly blend creativity, mindfulness, and functionality. You’re not just making crafts — you’re turning your art into something useful, personal, and lasting. And the best part? Every single placemat is completely one of a kind, because no two creative coloring crafts ever look exactly the same.
Whether you’re setting the table for a family dinner, crafting thoughtful handmade gifts, or simply enjoying a quiet moment of coloring, this project transforms your favorite hobby into everyday beauty. Coloring placemats has a magical way of making even the most ordinary Tuesday dinner feel a little more special.
Creative coloring crafts like these are also a wonderful way to connect with the people you love. Get the kids involved, make it a weekend activity, or turn it into a group crafting session with friends — the possibilities are as limitless as your color palette. Each finished placemat tells its own story, reflecting the mood, the season, and the hands that colored it.
What makes coloring placemats truly stand out from other creative coloring crafts is how effortlessly they fit into real life. They’re practical enough for everyday use, beautiful enough to display, and meaningful enough to keep. Laminate them, protect them, and watch your dining table transform into a rotating gallery of your own handmade art.
So grab your favorite coloring pages, pick up your colored pencils or markers, laminate your masterpieces, and make every meal more colorful — one placemat at a time. Because when creative coloring crafts meet the dinner table, that’s where the real magic happens.
Start your first set of DIY coloring placemats today — your table is waiting. 🎨
Keep Reading:
- Free Coloring Printables Guide for Kids & Adults
- Free Printable Coloring Pages
- Coloring Pages for Kids: Unleashing Creativity, Skills, and Smiles!
- Ultimate Seasonal Holiday Coloring Pages Guide
- Free Mandala Coloring Pages – 5-Page Printable Pack
- Autumn Leaves Coloring: The Complete Guide to Beautiful Fall Art
- Christmas Coloring Pages for Adults – Free, Standard & Premium Collections
- Joyful Nature Colouring Pages: Relaxing Art Inspired by Plants, Flowers, and Cactus Designs
- Printable Winter Coloring
- The Ultimate Guide to Printable Greeting Cards & DIY Greeting Cards
I love that this emphasizes process over product in creative work.
The quiet focus required for coloring is my favorite form of self-care.
These pages are beautifully designed. I’ve completed about a dozen so far and each one has been a genuinely enjoyable experience.